It may take a village to raise a child, but it also takes a bunch of equipment to make a Hollywood blockbuster. There's plenty of scope in between so, wherever you're at on your journey of making videos, read on.
We started with a mobile phone or a webcam and moved on as we learned what it was we were trying to do.
Lighting, Green Screens, microphones, video camera - they all can help but you can't beat passion, preparation and planning with a bucket load of enthusiasm and the willingness to learn as you go.
We see two main approaches - either plugging directly into a computer with USB Microphones, USB WebCam (or an app an your phone to create a higher quality version and similar working to that of a WebCam).
Or you record video and audio separately, and combine them later when you're editing on a computer.
We use both, depending on what we're doing.
Article Index
Audio Recording Equipment
We started with just our Mobile Phone internal microphone, or a webcam with a USB Microphone. They worked and got us going!
Our current microphones are a couple of Audio-Technica ATR2100x-USB, plugged into a Digital Mixing Desk. If you're plugging a microphone into your computer, you need a digital interface of some sort or you risk a wide variety of sound issues.
Our choice is a Behringer Mixing Desk, with integral digital interface. We mostly record our videos with one or two people only, so we record in stereo, with one microphone taking up the Left Channel and one the right Right Channel. The huge advantage of this method is that the two microphones are always in sync with each other (you can get ghost recording because two separately plugged in USB microphones will never be exactly synchronised on your computer and will pick up the other speaker, albeit much quieter, and slightly out of sync - hence the small echo you and up with). We can then easily edit each speaker separately, which saves loads of time later.
You can see channels 1 and 2 are set up with this set up - Channel 1 pans to the left, and Channel 2 to the right (the black knob, second up from the bottom).
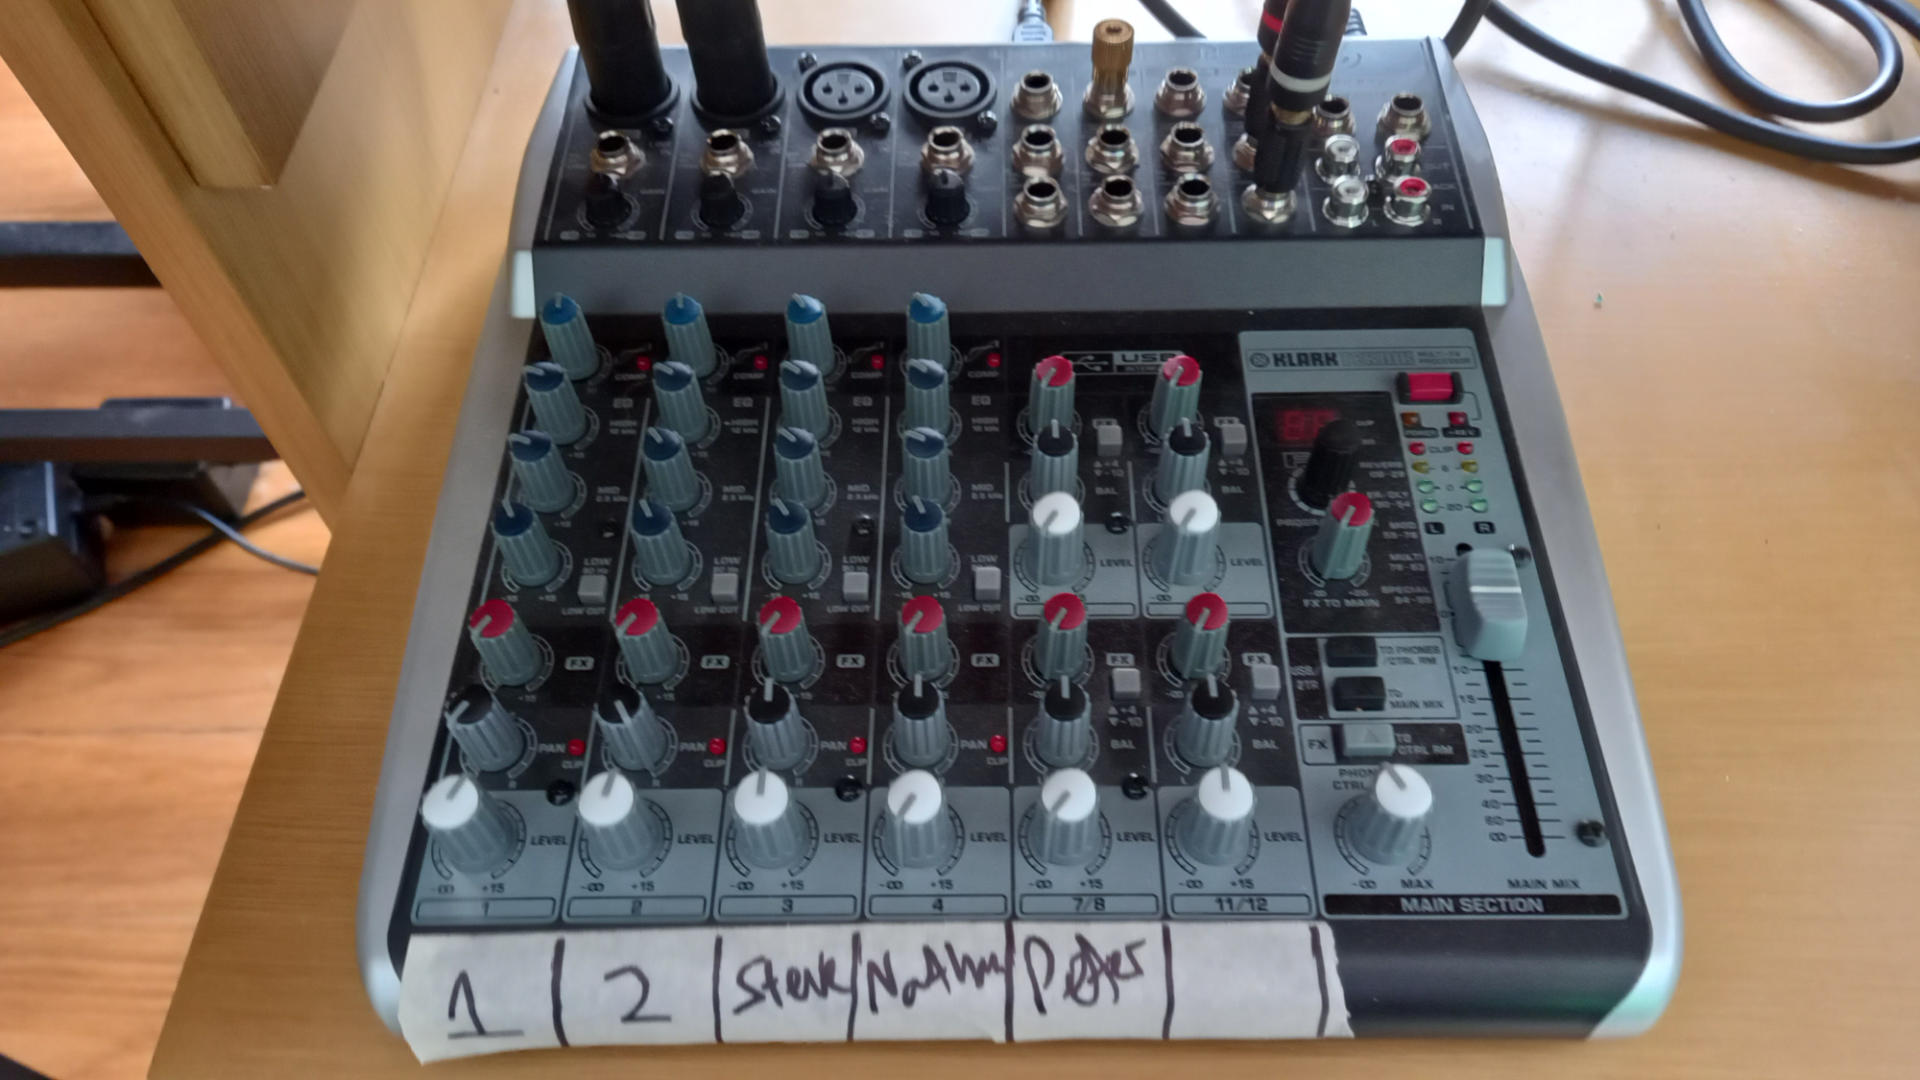
You can mute the ghost signal but this can take up lots of your time, and if two people speak at the same time, it becomes essentially impossible.
When we record our Radio Show, we have 5 people speaking, through the same mixing desk - so there is never an issue of ghosting/audio echo.
Our long term plan is to purchase a set of high quality lavalier microphones for use when shooting videos. For now our Audio Technicca microphones produce a really high quality sound, and we make them work for us. They are used lots, as we use these for the bulk of our Radio work too.
Back up to Index
Visual Recording Equipment
We started with WebCams, and then Mobile Phones. If you're just one person, the mobile phone is a fantastic, high quality, low cost solution. But, once you have two or more people in the shot, you get a distortion with objects further from the dead centre growing in size. It isn't easy to overcome, and can look quite weird.
We eventually moved on to a Canon EOS M200 Mirrorless Compact Camera, which is superb. It's a high quality image, up to 4k, although we only use the 1080 setting for our work, and 50 frames per second is what we're happiest with.
Normal TV is usually around the 25 FPS mark. This is simply the number of still images that make up one second of the video. The higher the quality, the more power your computer will need when it comes to editing. Also, too high a frame rate can create an unnatural looking shot, so experiment until you're happy.
Our camera - like the vast majority on the market - is not really helped to stay cool, and filming video will always end up heating your camera. We overcome this in a couple of ways.
For longer recording, we use an HDMI Capture Card (video interface) between the camera and our computer. This means the camera doesn't need to record to an SD card, works less hard and stays cooler. You lose some quality with this method, but we use it for certain filming.
The other thing we did was create a battery powered heat sync, with the fan from a Raspberry Pii, and a couple of laptop heat syncs stuck to a thin sheet of copper using PC grade sticky thermal transfer pads . I made it by hand in less than an hour, and it attaches, non-permanently, under the camera (via the mounting point) and presses against the back of the camera. I [permanently] borrowed the battery pack from a set of battery powered Christmas lights!
It isn't pretty, but it is easy to attach as needed and it works well for us: we rarely record long segments of video anyway. Beyond 10 minutes at one time is rare. If if expect this, then we just switch to the HDMI Capture Card.
One small note on maximising the look is to set your camera a good distance away from you, and zooming in, as this makes the overall look more dynamic. Sounds odd, but it works and is advice we found online frquently.
Back up to Index
Lighting Equipment
We started with no lights, although the sun is pretty good as a light source. However, it changes in brightness - which can be picked up a camera, and affect the look. Not least the fact that clouds can block the sun too.
With a Web Cam or phone, it's worth playing with the settings. We quickly learned to disable its ability to automatically change things like brightness and set this manually instead. Then, as the sun changes a little, or a cloud appears, you don't have a totally ruined shot.
Control the light!
We currently have three types of lighting in our studio. But the first thing we always do now is to control the light. We've got a good set of blackout curtains on the window of our studio, and we add the lighting we want.
You work with what you have and we don't have a large studio. So we doubtless don't do things 'correctly' but we make our situation work for us. Have a search on the internet and there are many kind people with high quality advice on how you should use lighting. I watched a few, combined the information, and made it work for our situation. We almost always film with a green screen, so getting the lighting right is a little more fiddly, but worth an investment in time.
We have a small LED Panel Light to fix a dark patch on the green screen behind where we sit plus a set of studio lights (from ESDDI) just to light up the green screen evenly. And we then have a second set of highly adjustable studio lights (from Neewer) to light the people and set. We usually turn the colour to 4400k and the brightness at 85%. These numbers are great! But, you need to figure out the look you're going for. that 4440k number can be turned up for a whiter light, and down for a warmer light.
If you want to turn down the brightness of a light, and don't have the ability to do so, you can do what we did and cut up a basic, fabric, shower curtain cut into squares. Just make sure there's no danger of it touching the bulb - if you have one!! Ours always point down, so that couldn't happen anyway - gravity is our friend here. But they're secured away from the bulb/light source anyway: LED lighting may not get holt like standard bulbs, but it can still get hot - we exclusively use LED lighting in our studio, but after a long session you definitely the lights are on with the extra heat it generates!
Back up to Index
Studio Extras
Green Screen
Our Green Screen was a definite boost to what we do! It's a proper studio set, which we always leave in place for our work. Making it nice and taut makes a huge difference, as you diminish shadows and, post edit, it gets much easier to remove the green screen.
One thing we learned quickly is the importance of sitting as far away from the green screen as possible. Due to our studio size we can't be as far away as we wanted, so have to regularly balance this with what we can actually do. Ideally, you light up the rear of the people in front of the green screen. We can't do that either. So we just make it work the best we can for our situation.
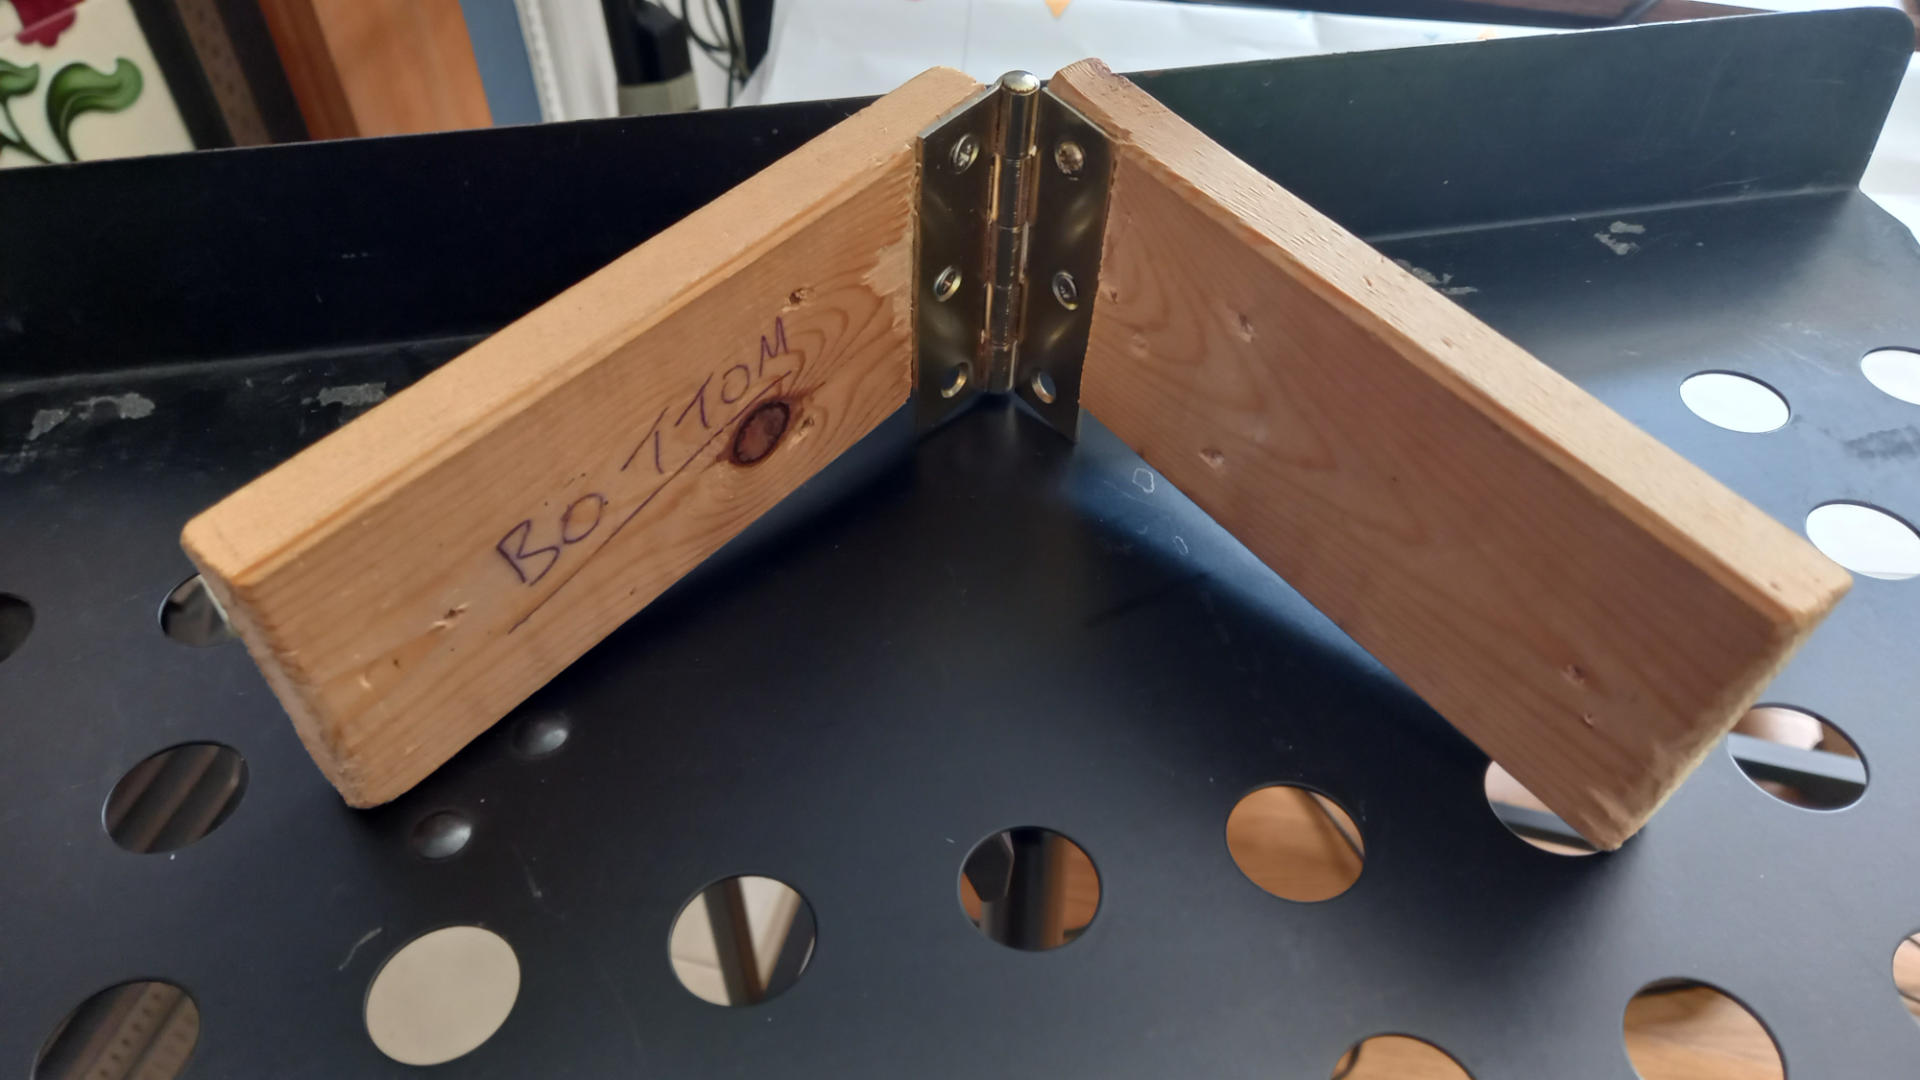
Clapper
We made a small 'clapper' out of two bits of wood and a brass hinge we had in the garage. This enables us to provide a visual and audio point to easily synchronise things when we're editing. Just make sure it is in the shot, snap it together, and you can sort your audio/video sync. later on.
 A4 Whiteboard
We have an A4 sized whiteboard where we write the Name, Season Number, Episode Number and Take Number down. We note the take number to ensure we're editing the right version when filming doesn't go as smoothly as we'd hoped. We record our audio via OBS, which means we can have multiple audio sources, and we simply type the details then we can literally see what any piece of audio is. We can film a dozen different things in a day, so being able to easily distinguish these later saves MUCH stress and time.
Notepad
We write down what we want to record on a notepad at our weekly planning session, so our filming day is literally just that. We simply cross things out as we go! As daft as this may sound, it saves so much wasted time having a simple progress sheet for our complicated, and very full, filming day each Saturday.
Water
Speaking or singing into a microphone dries your mouth rapidly. Depending on who is doing what, we have a runner who can fetch water and make sure we're hydrated!
Masking Tape
Whether to label up a mixing desk (top image), or marking out where the feet of a stool goes on a rug (you can see this on the image below), masking tape comes in handy in all sorts of ways.
Audio Editing
There are plenty of audio editors. Our favourite is a program called Reaper. It just has so many things we can set as default options, saving us lots of time. It's great if you want to simply improve the audio, or work on the volume levels of your recordings.
You can use it, fully, for free. But, if you want to keep using it, you can pay for it - supporting the work that has been done making such good software.
Normalising the audio is a basic first thing, because it makes the louder parts less loud, and the quieter parts less quiet. This leads to a more balanced sound that will be appreciated by people watching (or listening) to what you produce.
Another great thing to work out is how to remove any hiss or hum. It can be called a few different things, but if you can remove a little hiss, you lift the quality.
We also add a little bass to our audio too.
While you can add a filter to remove the popping sounds that are common, and can ruin an audio recording, prevention is always better than a cure. Angle the microphone slightly if you need it close to you mouth, so the air pressure of your speech has somewhere to escape! We do this, and we also made some bespoke pop shields.
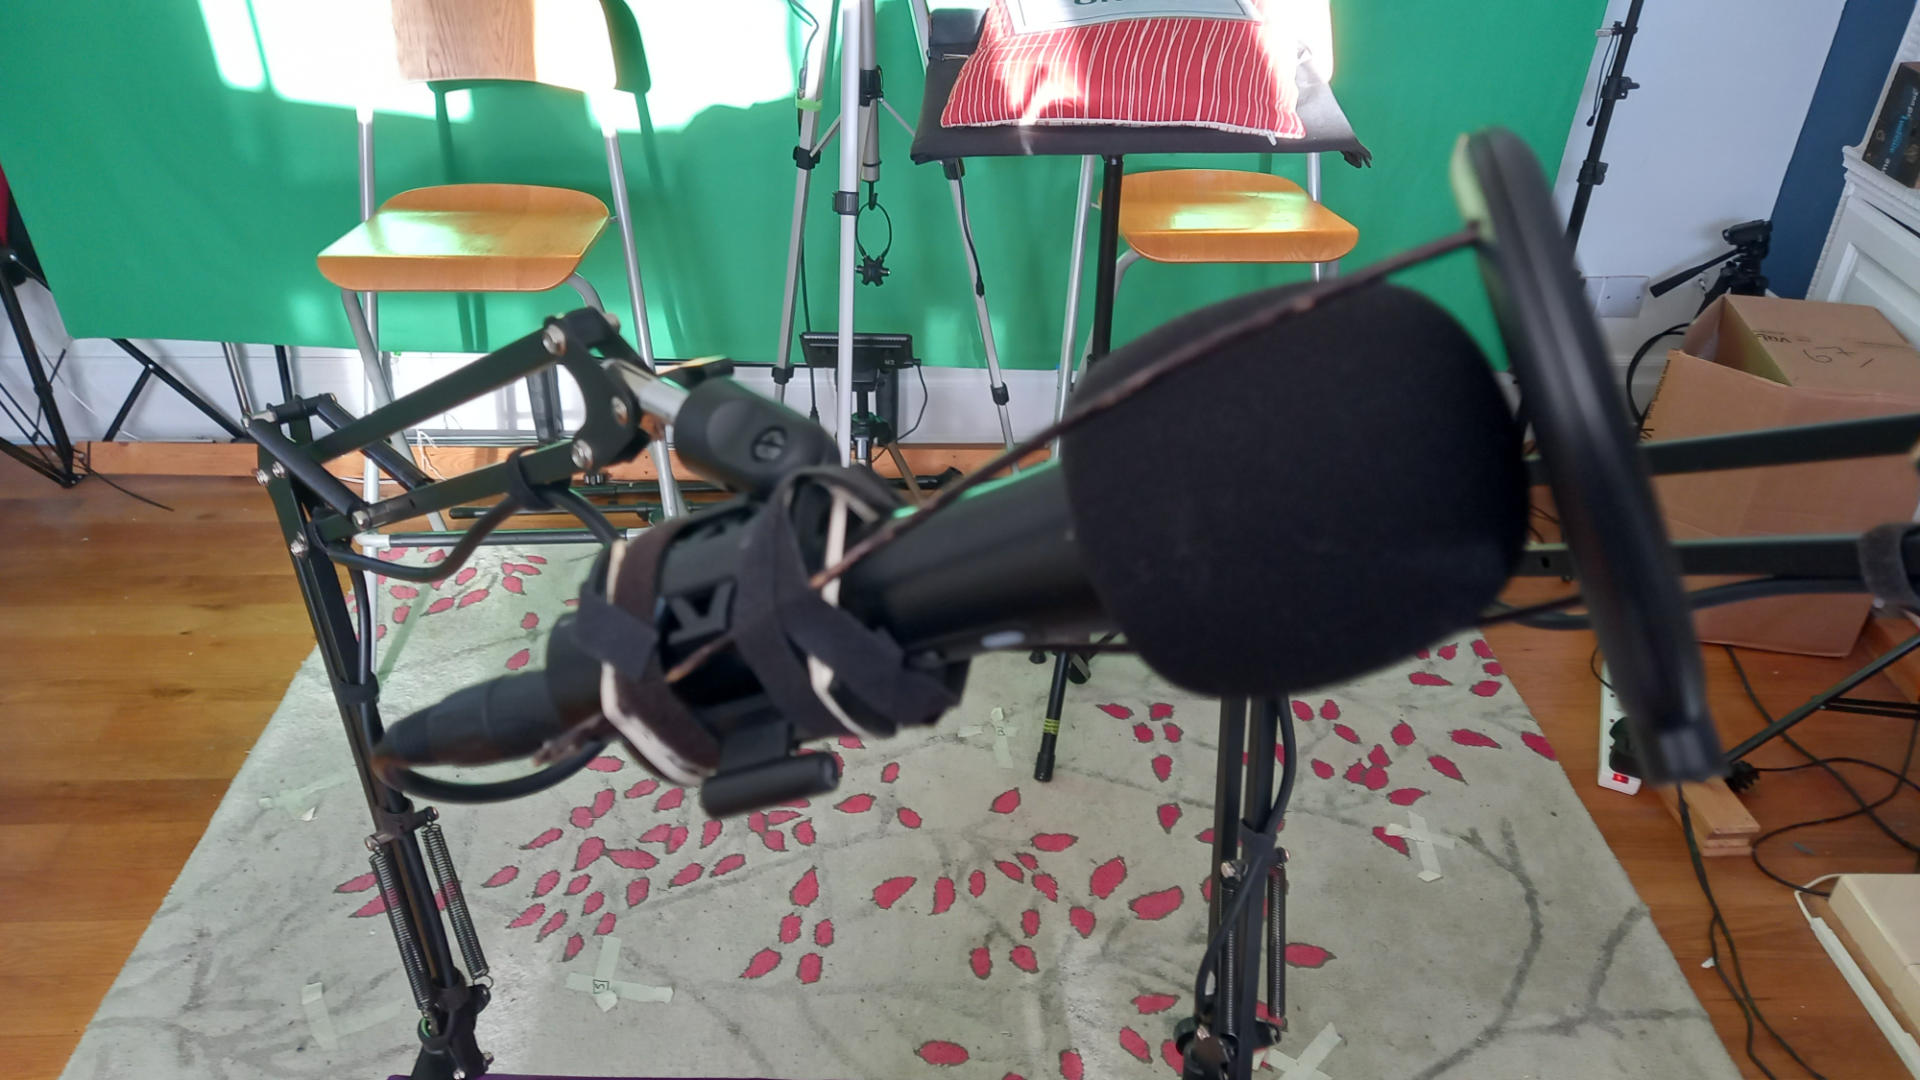
You can easily buy these, but I didn't like what was available because they're either too large and unsightly or they bendy arm they come with breaks or never goes where you want it to. And, besides, we got fed up moving both microphone and pop shield for different people.
With a little time and effort I separated the actual shield, and drilled some tiny holes. Using some bamboo skewers, and a black permanent felt tip pen, I coloured them black, and then secured them to the mic holder. Now, we have a far more subtle op shield, that moves with the microphone.
Back up to Index
Video Editing
Davinci Resolve
We've used a few different pieces of software. We use Davinci Resolve, which has more features than we can see us ever needing.
It's a truly fantastic program, and no we're paid to say that. The free version is beyond outstanding, and if you need more features - and want to support the company that produces such a high quality program - buy the software.
It's a bit of a learning curve to get your head around it, especially if you're coming from another video editing program - as we were - but their community is great, with many videos around to help you do what you need to. #
We especially love the fact that we can edit the videos we produce so very easily, as well as the audio - all within the same piece of software. That's been a game changer for the time spent editing videos.
Our computer is a sufficiently powered machine for the job. Don't forget that video editing is one of the most intensive things you can ask a computer to do.
We made to with a very basic, old and underpowered computer for several years. We made it work for us, by being patient and treating it gently!
OBS
OBS is a free piece of open source software. It's main benefit for us is that it allows us to plug a mobile phone, or video camera, into a computer and record our video and audio. We record most of what we directly on to a video camera now, but not always. OBS is still our go to choice for recording multiple things at once; we usually have a couple of microphones and a a camera, or two, and OBS enables us to easily bring them all together, easily.
The online community is especially helpful for learning how to use OBS for your situation. And, if you want to livestream what you're doing, it really comes into it's own!